How to create a white label iOS app (Part 4)

On Part3 we discussed how to use Preprocessor Flags to change the result of the coffeeDescription function based on which target was executing the function. As I noted, I don't like the Preprocessor Flags solution but it was a good example to understand how they work.
You can download the project here as we left it on Part3.
A much better alternative is to use a .plist file (Properties List) for each target. We are going to create a .plist file for each target and we are going to load these properties in the app.
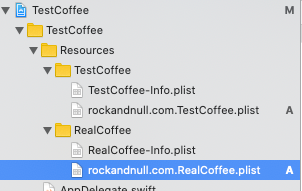
We will create 2 .plist files for our targets, and the name of each file it will be the Bundle ID. The rockandnull.com.TestCoffee.plist will be visible only to TestCoffee target and the rockandnull.com.RealCoffee.plist will be visible only to RealCoffee target (using target memberships).

The objective is to load the properties in the target using a singleton class called PropertiesController.
import Foundation

class PropertiesController {

    static let sharedInstance = PropertiesController()
    var description : String!

    func loadProperties() {
        let bundleID = Bundle.main.bundleIdentifier
        if let path = Bundle.main.path(forResource: bundleID, ofType: "plist") {
        	//CAUTION: We are not using best practices for simplicity. Using plain string as a key and force unwrapping is prone to errors.
            if let nsDictionary  = NSDictionary(contentsOfFile: path) {
                self.description = nsDictionary["description"] as? String ?? ""
            }
        }
    }
}
The loadProperties function is responsible to load the specific .plist file using the Bundle ID (that's why we named our .plist files after the Bundle ID). Then it converts the .plist file to an NSDictionary and then assigns the value of each key to the specific properties.
We need to load the properties first thing, so we are going to add this code in AppDelegate
func application(_ application: UIApplication, didFinishLaunchingWithOptions launchOptions: [UIApplication.LaunchOptionsKey: Any]?) -> Bool {
        // Override point for customization after application launch.
        PropertiesController.sharedInstance.loadProperties()
        return true
}
Then we will modify our coffeeDescription function in Coffee class
 static func coffeeDescription() -> String {
      return PropertiesController.sharedInstance.description
 }
The last thing (I promise) to complete this approach is to add a property (String) in rockandnull.com.TestCoffee.plist with the key description and value TestCoffee. Repeat the procedure for RealCoffee and set the value as RealCoffee.
Now we will run the app and we will notice that we have accomplished the same result with the Preprocessor Flags solution.
So, why the fuss? It's a much cleaner solution. In Part3 we had only 2 targets and we used 7 lines of code. Imagine how much boilerplate code we would end up having in a project with 30 targets. With the .plist solution, our function's size will remain the same no matter how many targets we have added.
Also, you can add other types of data in the .plist, like a number, a boolean, a date, etc. I use the .plist approach to store the API endpoint, a copy that is different for each brand and specific color as HEX. This approach will work nicely if you discuss it with your designer and ask him/her to group the project colors in let's say, 6 groups. Then you will create 6 properties and you will assign the HEX code for each color and load them in PropertiesController as we did with description. Now, for each view that you want to set a color you will use the PropertiesController.sharedInstance.Colour1. That's it you can now change the colors of the whole app from the .plist file.
Use with caution! Don't use the .plist approach to store sensitive data. A .plist file is unencrypted and can easily be fetched from a device. I can't stress this enough!
Happy coding!


